Although you can create a View entirely from the dialogues in the View Edit screen, without a line of additional code, there are times when you want more control over the final output from your View. You can fully customize the appearance of your View by editing its Loop Output.
Add a new View in case you still do not have one, and open its edit screen. Scroll down to the Loop Output section.
wpml-string
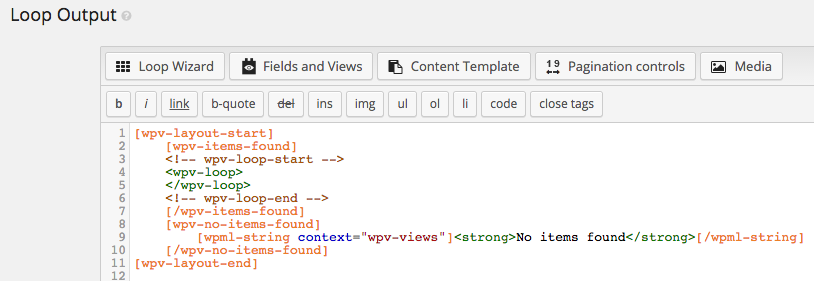
You will probably see something like the following:
[wpv-layout-start]
[wpv-items-found]
<!-- wpv-loop-start -->
   <ol>
      <wpv-loop>
         <li></li>
      </wpv-loop>
   </ol>
<!-- wpv-loop-end -->
[/wpv-items-found]
[wpv-no-items-found][wpml-string context="wpv-views"]<strong>No posts found</strong>[/wpml-string][/wpv-no-items-found]
[wpv-layout-end]
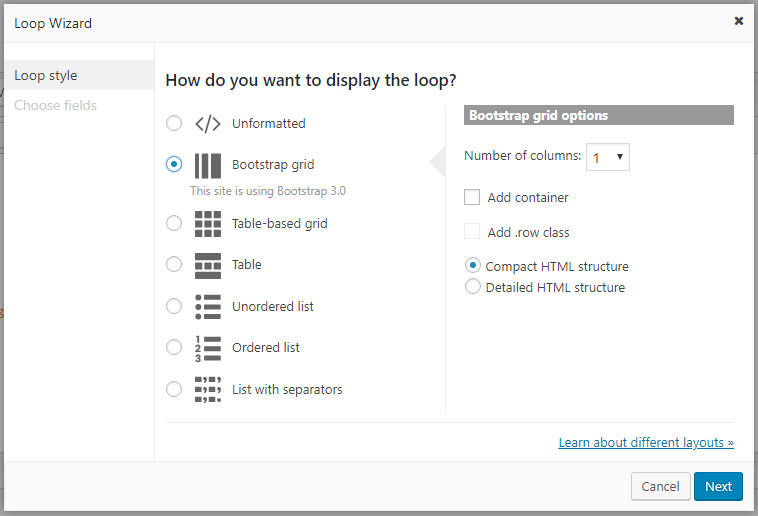
This is the default Loop Output for an ordered list – you can change the output style and add shortcodes to it by clicking on the Loop Wizard button.
In the next step, you can select the fields to include in the loop. Next to each field, there is an Edit button, which opens a new dialog for setting attributes, related to this field.
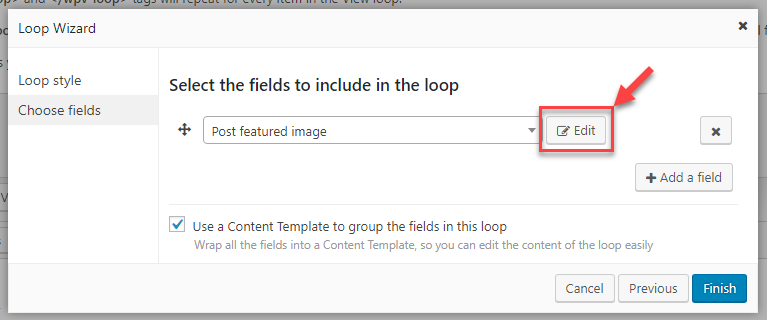
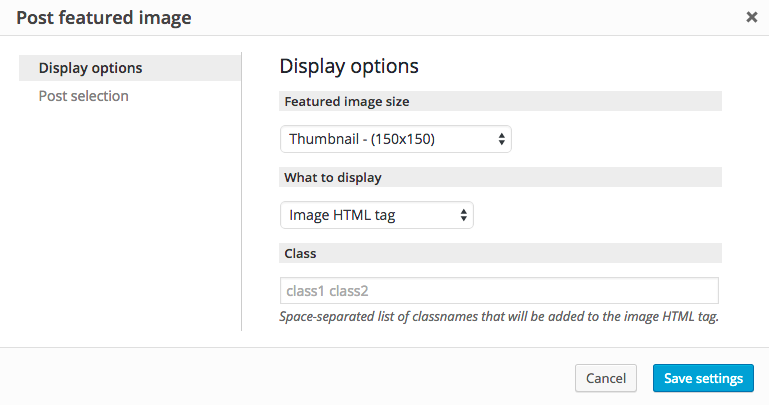
For example, if you select a Post featured image field and click Edit, you can set the image size, what to display and the classes that you want to add to the image.
Elements of the View Loop Output
Let’s look at the View Loop Output shortcodes in more detail:
- Layout start/Layout end
- Items found/no items found
- Items count, found count
- The loop
- Loop parameters
- Bootstrap layout in the loop
Layout start/Layout end
[wpv-layout-start][wpv-layout-end]
These shortcodes are used to indicate when the View loop starts and ends. They only output some HTML when your View uses AJAX pagination, so it’s better not to remove them.
Items found/no items found
[wpv-items-found][/wpv-items-found]
[wpv-no-items-found][/wpv-no-items-found]
If items are found by the View after applying all its settings, then your output wrapped in the [wpv-items-found] will be processed.
If no items are found, then output wrapped in the [wpv-no-items-found] will be processed. This is normally used to return a message to the user. In our default example above, we have the following:
[wpv-no-items-found][wpml-string context="wpv-views"]<strong>No items found</strong>[/wpml-string][/wpv-no-items-found]
This will display No items found to the user, if the condition is met.
The [wpv-items-found] and [wpv-no-items-found] shortcodes are optional.
Items count, found count
[wpv-items-count]
[wpv-found-count]
The [wpv-items-count] and [wpv-found-count] shortcodes have a similar function.
The [wpv-found-count] shortcode will display the count of the number of items returned by the View (after all filters have been applied).
The [wpv-items-count] shortcode will display the count of the number of items to be displayed on the current page.
If pagination is not enabled, then the value of the two shortcodes will be the same.
The loop
The loop is at the heart of our View. Anything contained between the <wpv-loop></wpv-loop> tags will be processed once for each post output by your View.
[wpv-layout-start]
[wpv-items-found]
<!-- wpv-loop-start -->
   <ol>
      <wpv-loop>
         <li>[wpv-post-link]</li>
      </wpv-loop>
   </ol>
<!-- wpv-loop-end -->
[/wpv-items-found]
[wpv-no-items-found][wpml-string context="wpv-views"]<strong>No posts found</strong>[/wpml-string][/wpv-no-items-found]
[wpv-layout-end]
Assuming we have posts output from our View, the above will generate an ordered list, with one list-item for each post:
<!-- wpv-loop-start -->
<ol>
	<li><a href="/tablet-computer-repair/">Tablet Computer Repair</a></li>
	<li><a href="/learn-about-android/">Learn about Android</a></li>
	<li><a href="/buy-cheap-smartphones/">Buy Cheap Smartphones</a></li>
	<li><a href="/soccer-lessons-for-under-16s/">Soccer Lessons</a></li>
	<li><a href="/video-your-event/">Video your Event</a></li>
	<li><a href="/sailing-boat/">Sailing boat</a></li>
</ol>
<!-- wpv-loop-end -->
Loop parameters & wpv-item : wrap, pad, pad-last, index
We can squeeze a lot more power out of our loop using the loop parameters and [wpv-item] shortcode. In combination, these will allow us to output groups of posts, and target specific posts in the group.
We are going to look at an example to illustrate this functionality:

These are the requirements for our featured ads section :
- Display a Bootstrap grid with four ads per row.
- If the last row is incomplete, pad out with a “Your ad here” image.
- Our last image in the grid, will be a “Premium ad announcement image”.
[wpv-layout-start]
[wpv-items-found]
  <div class="classified_featured_wrapper"><!-- Open Wrapper -->
     <wpv-loop wrap="4" pad="true">
        [wpv-item index=1]
		<div class="row"><!-- Open Row -->
			<div class="span3">
				[wpv-post-featured-image]
				<h2>[wpv-post-link]</h2>
				<span>[types field="price"][/types] USD</span>
			</div>
        [wpv-item index=other]
			<div class="span3">
				[wpv-post-featured-image]
				<h2>[wpv-post-link]</h2>
				<span>[types field="price"][/types] USD</span>
			</div>
        [wpv-item index=4]
			<div class="span3">
				[wpv-post-featured-image]
				<h2>[wpv-post-link]</h2>
				<span>[types field="price"][/types] USD</span>
			</div>
		</div><!-- Close Row -->
        [wpv-item index=pad]
			<div class="span3">
				<img src="/assets/your-ad-here.jpg" />
			</div>
        [wpv-item index=pad-last]
			<div class="span3">
				<img src="/assets/premium-ad.jpg" />
			</div>
		</div><!-- Close Row -->
     </wpv-loop>
  	</div><!-- Close wrapper -->
[/wpv-items-found]
[wpv-no-items-found][wpml-string context="wpv-views"]<strong>No featured ads to display</strong>[/wpml-string][/wpv-no-items-found]
[wpv-layout-end]
Before we look at the code in more detail, we’ll look at the loop parameters in the context of our output.
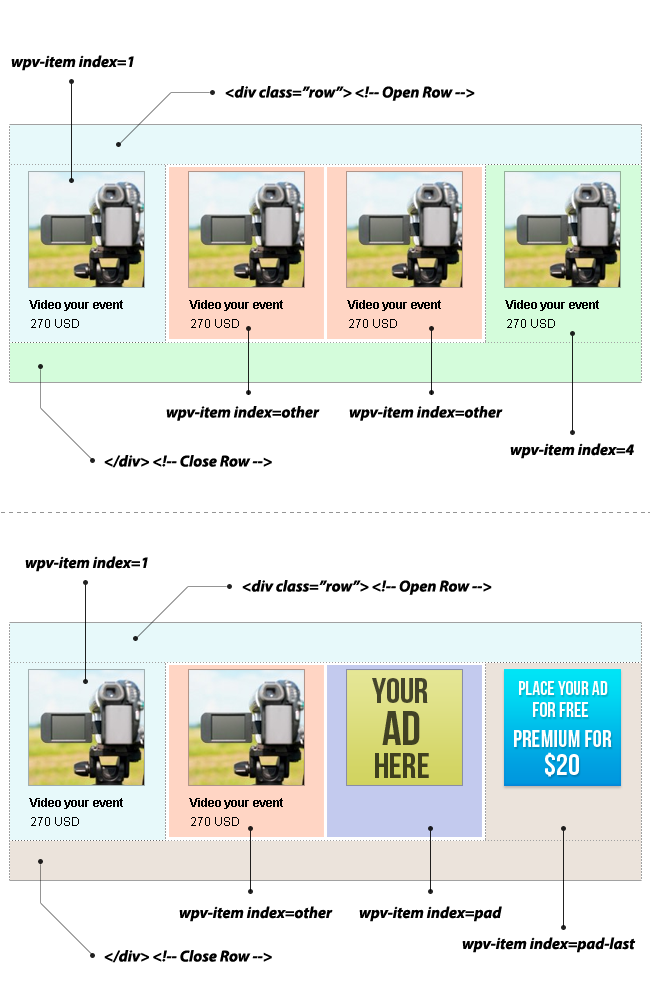
This the HTML that our view will generate on the site.
So what are challenges with this type of grid output?
- We want our grid to have 4 cells per row.
- We need to open and close the Bootstrap row for each group of 4 posts.
- We’ll need to add specific empty cells if we run out of posts before completing our last row.
- We’ll need to close our last row.
We have a few tools at our disposition to achieve this.
Loop parameters: wrap and pad
Our loop tag takes two optional parameters, wrap and pad:-
<wpv-loop wrap="4" pad="true">
The wrap parameter tells Views that we are going to process the posts from our view query, in groups. Posts are still processed one by one, but Views now “knows” that we have a logical grouping of posts. In this case, the 4 divs that will make up each row of our Bootstrap grid.
Our pad parameter enforces the grouping that we specified in our wrap parameter. If pad=true then we will always run the loop in groups of 4. In our classifieds example we have 6 adverts to output, by specifying pad=true we are going to run the loop two extra times to make a total of 8 – 6 for our posts and two padding loops to fill our last row.
Loop shortcode: [wpv-item] and the index parameter
Our key shortcode in the loop is [wpv-item] and this takes the obligatory parameter index. Our index parameter can take the following values:
- a number, which targets the position in the loop
- odd/even to produce zebra styling
- pad and pad-last when the loop needs to wrap in items per row
- other for anything else
- split2, split3, split4 or split5 to target items that divide the number of results
Our key shortcode in the loop is [wpv-item] and this takes the obligatory parameter index. Our index parameter either takes a numeric value, other, pad or pad-last. It can also take odd and even values, for zebra styling.
If the index condition is met, then code below the condition will be executed.
In our classifieds example, we have a total of 6 records, and a grouping wrap of 4.
[wpv-item index=n]
If we assign a number to our index, we are targeting the nth post in our wrap group.
In our classifieds example [wpv-item index=1], will be processed for the first post in our group (row): 1,2,3,4,5,6. This will create the opening DIV for our Bootstrap row and display the details for the post.
[wpv-item index=1]
<div class="row"><!-- Open Row -->
	<div class="span3">
		[wpv-post-featured-image]
		<h2>[wpv-post-link]</h2>
		<span>[types field="price"][/types] USD</span>
	</div>
[wpv-item index=4] will be processed for the last post in our group (row) – 1,2,3,4,5,6 – this will display the advert for the post and close the DIV for our Bootstrap row.
[wpv-item index=4]
	<div class="span3">
		[wpv-post-featured-image]
		<h2>[wpv-post-link]</h2>
		<span>[types field="price"][/types] USD</span>
	</div>
</div><!-- Close Row -->
[wpv-item index=other]
[wpv-item index=other] is processed for all posts in the group that are not identified by a numeric index – 1,2,3,4,5,6
[wpv-item index=other]
	<div class="span3">
		[wpv-post-featured-image]
		<h2>[wpv-post-link]</h2>
		<span>[types field="price"][/types] USD</span>
	</div>
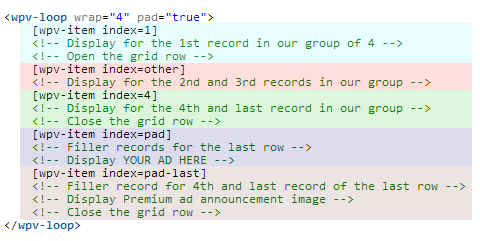
[wpv-item index=pad]
In our classifieds example, only 6 posts will be output, this is where our padding comes into play. By specifying the pad parameter on our loop, pad=”true”, along with a wrap value of 4, we’ve told views to continue running the loop when we are out of posts until we reach a multiple of 4.
[wpv-item index=pad] will be processed for the empty runs of the loop – 1,2,3,4,5,6,7,8 – in this case just once. We’ve used this value to display our ‘Place your ad here’ message.
[wpv-item index=pad]
	<div class="span3">
		<img src="/assets/your-ad-here.jpg" />
	</div>
[wpv-item index=pad-last]
[wpv-item index=pad-last] will be processed for the last record of our last row – 1,2,3,4,5,6,7,8 – we’ll use this to display our ‘Premium ad’ and close the DIV for our Bootstrap row.
[wpv-item index=pad-last]
	<div class="span3">
		<img src="/assets/premium-ad.jpg" />
	</div>
</div><!-- Close Row -->
[wpv-item index=pad-splitN]
If we set a splitN value to index, we will target the item that divides the number of results into N groups. The available values are split2, split3, split4 and split5.
For example, [wpv-item index=split2] will target the item that divides the number of displayed items into two groups. If we display 10 items this will target the 5th one.
[wpv-item index=split2]
    <div class="span3">
        <span>This items divides the results into two groups</span>
    </div>
Bootstrap output in the loop
Views has a BootStrap Grid loop output mode. It will allow you to add a row to your page and adapt the width of the items in the row dynamically, depending on the number of items to be displayed. You can see an example of how this works on the Toolset WooCommerce demo site. There, products are output in a nice Bootstrap grid.
Further examples
We often need to highlight or feature a specific post or item in the loop. Our wpv-item index parameter gives us an easy way of achieving this.
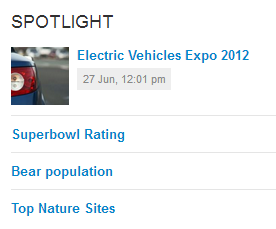
Featured post
In this example, we are going to display a list of posts on our home page. For the first post [wpv-item index=1] we’ll display the title with link and an image, for all other posts [wpv-item index=other] we’ll just display the title with a link.
[wpv-layout-start]
[wpv-items-found]
<!-- wpv-loop-start -->
<ul>
	<wpv-loop>
		[wpv-item index=1]
		<li>
			<a href="[wpv-post-url]">[wpv-post-featured-image]</a>
			<h3>[wpv-post-link]</h3>
			<p class="date">[wpv-post-date format="j M, h:i a"]</p>
		</li>
		[wpv-item index=other]
		<li>
			<h3>[wpv-post-link]</h3>
		</li>
	</wpv-loop>
</ul>
<!-- wpv-loop-end -->
[/wpv-items-found]
[wpv-no-items-found][wpml-string context="wpv-views"]<strong>No posts found</strong>[/wpml-string][/wpv-no-items-found]
[wpv-layout-end]
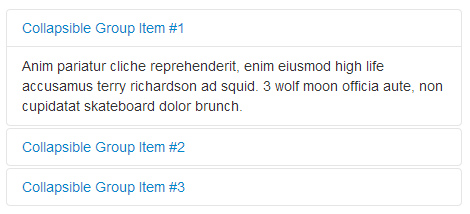
Bootstrap Collapse – expand first post
We often come across components where we need to indicate a specific post as “the first slide to be displayed”, “the active tab” or in the case of the Boostrap accordion component, “an expanded item”.
If we want the default view for our accordion to show an expanded item, we need to add the class in, to the accordion body element, and we only want to do it for the first record
[wpv-layout-start]
[wpv-items-found]
<!-- wpv-loop-start -->
<div class="accordion" id="accordion2">
	<wpv-loop>
		[wpv-item index=1]
		<div class="accordion-group">
			<div class="accordion-heading">
				<a class="accordion-toggle" data-toggle="collapse" data-parent="#accordion2" href="#collapse-[wpv-post-id]">
					[wpv-post-title]
				</a>
			</div>
			<div id="collapse-[wpv-post-id]" class="accordion-body collapse in">
				<div class="accordion-inner">
					[wpv-post-body view_template="None"]
				</div>
			</div>
		</div>
		[wpv-item index=other]
		<div class="accordion-group">
			<div class="accordion-heading">
				<a class="accordion-toggle" data-toggle="collapse" data-parent="#accordion2" href="#collapse-[wpv-post-id]">
					[wpv-post-title]
				</a>
			</div>
			<div id="collapse-[wpv-post-id]" class="accordion-body collapse">
				<div class="accordion-inner">
					[wpv-post-body view_template="None"]
				</div>
			</div>
		</div>
	</wpv-loop>
</ul>
<!-- wpv-loop-end -->
[/wpv-items-found]
[wpv-no-items-found][wpml-string context="wpv-views"]<strong>No posts found</strong>[/wpml-string][/wpv-no-items-found]
[wpv-layout-end]