The basic building blocks in Layouts are cells. Users insert cells into the layout. They can move, resize and edit them. The Layouts plugin comes with different cell types, for texts, menus, widgets and other site-elements. This tutorial explains how you can create custom cell types, which implement your own functionality.
The built-in cells, which you can see in Layouts, were all created with the cells API. This means that your custom cells can have all the features that you see in the built-in cells.
Cells have:
| 1. A GUI, which lets users edit the cell information | 2. A render function, which displays the cell content in the front-end | 3. An ‘edit mode’ render function, which displays a preview of the cell when editing the layout | 4. Storage, which can hold information needed to display the cell |
|---|---|---|---|
 |
 |
 |
 |
On this page:
- Registering a new Cell type
- Adding repeating fields to a cell
- Load cell template files in your theme
- Handling Dialog Events
- Fields API
- Translating cell fields
Registering a new Cell type
Use register_dd_layout_cell_type() to register a new cell type.
<?php register_dd_layout_cell_type( $cell_type, $args ) ?>
This returns true on success and false on failure. If it returns false then that $cell_type has already been registered. This function should be called during the “init” action.
Parameters:
- $cell_type – String identifier. This is used to identify the new cell type.
- $args – Array of arguments.
Arguments:
- name – Name of the cell type.
- icon-css – CSS class name for the icon. This is displayed in the popup when creating new cell types. (optional)
- icon-url – URL for the icon. Can be used instead of icon-css. (optional)
- category – Category used to group cell types together. (optional – defaults to “general cells” category.
- preview-image-url – Image to be displayed in the popup when creating new cell types.
- button-text – Text for the button that is displayed in the popup when creating new cell types.
- dialog-title-create – Dialog title to be displayed when creating a new cell of this type
- dialog-title-edit – Dialog title to be displayed when editing a cell of this type
- dialog-template-callback – Function name of a callback function that supplies the user interface for creating or editing the cell type. Can be left blank if the cell type has no UI.
- cell-content-callback – Function name of a callback function that returns the HTML to be rendered in the front end. This function will receive the values in $cell_settings that the user has entered via the cell edit dialog.
- cell-template-callback – Function name of a callback function that returns the HTML for displaying the cell in the editor.
- cell-class – Class name or names to add when the cell is output. Separate class names with a space. (optional)
- register-styles – Array of styles required for the cell in the layouts editor. Each array item should be an array with values the same as wp_register_style(). Only the first two are required – array($handle, $src, $deps, $ver, $media)
- register-scripts – Array of scripts required for the cell in the layouts editor. Each array item should be an array with values the same as wp_register_script(). Only the first two are required – array($handle, $src, $deps, $ver, $in_footer)
Example – a simple text cell
This example creates a simple text cell. It allows a user to enter a line of text and then displays it in the front-end when the cell is rendered. The code for this cell can be found in /reference-cell/reference-cell.php in the Layouts code.
The first step is to register the new cell type. Layouts will then use callback functions to obtain further data.
<?php function register_reference_cell_init() {
  register_dd_layout_cell_type (
    'reference-cell',
     array ( 'name' => __('Reference cell', 'theme-context'),
             'icon-css' => 'icon-font',
             'description' => __('A cell that displays simple text.', 'theme-context'),
             'category' => __('Example cells', 'theme-context'),
             'button-text' => __('Assign reference cell', 'theme-context'),
             'dialog-title-create' => __('Create a new reference cell', 'theme-context'),
             'dialog-title-edit' => __('Edit reference cell', 'theme-context'),
             'dialog-template-callback' => 'reference_cell_dialog_template_callback',
             'cell-content-callback' => 'reference_cell_content_callback',
             'cell-template-callback' => 'reference_cell_template_callback',
             'cell-class' => 'reference_cell',
            'register-styles' => array(array('reference-cell-style', get_template_directory_uri() . 'my-style.css')),
            'register-scripts' => array(array('reference-cell-script', get_template_directory_uri() . 'my-style.js'))

            )
    );
}
add_action( 'init', 'register_reference_cell_init' );
See reference-cell.php for a fully commented version of this that explains what each attribute does.
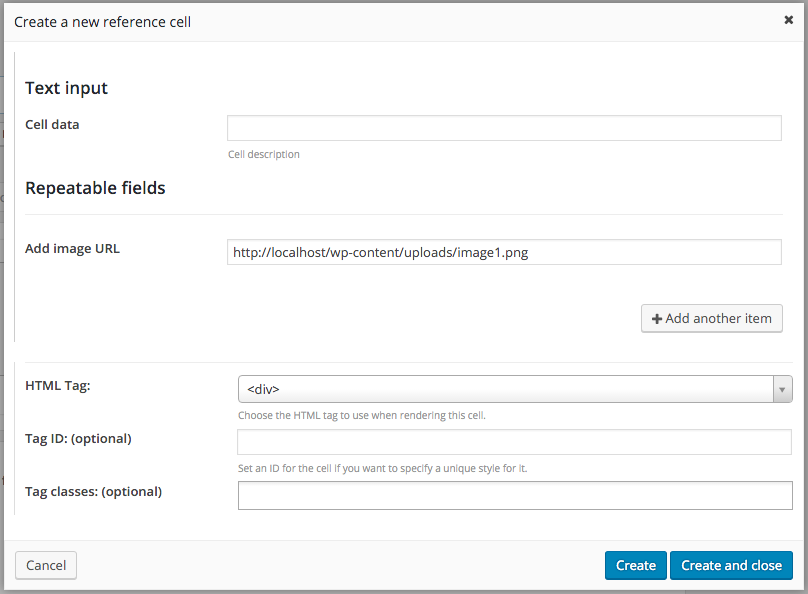
Now we’ll add the callback function for dialog that will be used in the Layouts editor when creating or editing a cell of this type.
We need a single HTML text input field to acquire the text that the user wants to display. The name parameter of the input element should be set using the_ddl_name_attr. Layouts will then use this to automatically save and load the dialog data to the layout.
/* Callback function that returns the user interface for the cell dialog.
 * Notice that we are using 'text_data' for the input element name
* "camelCase" and "_ " underscore character are allowed. Don’t use
* hyphens as property names
* This can then be accessed during frontend render using
 * $cell_settings['text_data']
 */

function reference_cell_dialog_template_callback() {
    ob_start();
    ?>

        <?php
            /*
             * Use the the_ddl_name_attr function to get the
             * name of the text box. Layouts will then handle loading and
             * saving of this UI element automatically.
             */
        ?>

        <div class="ddl-form reference-cell">

            <?php // Display simple text input ?>
            <h3>
                <?php _e('Text input', 'theme-context' ); ?>
            </h3>
            <p>
                <label for="<?php the_ddl_name_attr('text_data'); ?>"><?php _e('Cell data', 'theme-context' ); ?></label>
                <input type="text" name="<?php the_ddl_name_attr('text_data'); ?>">
                <span class="desc"><?php _e('Cell description', 'theme-context' ); ?></span>
            </p>

        </div>

    <?php
    return ob_get_clean();
}
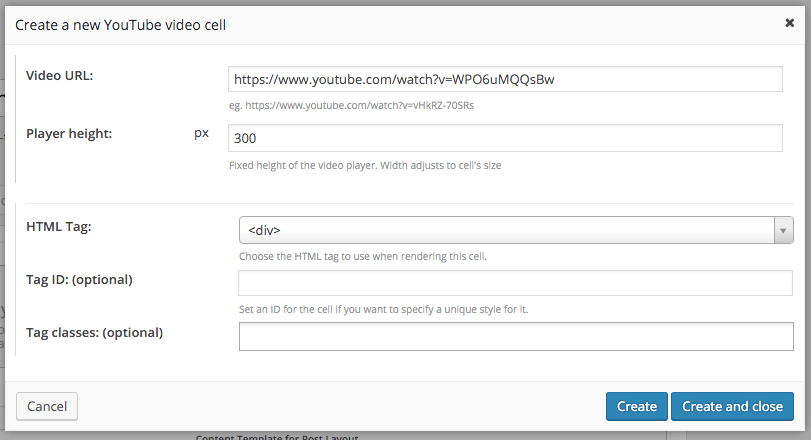
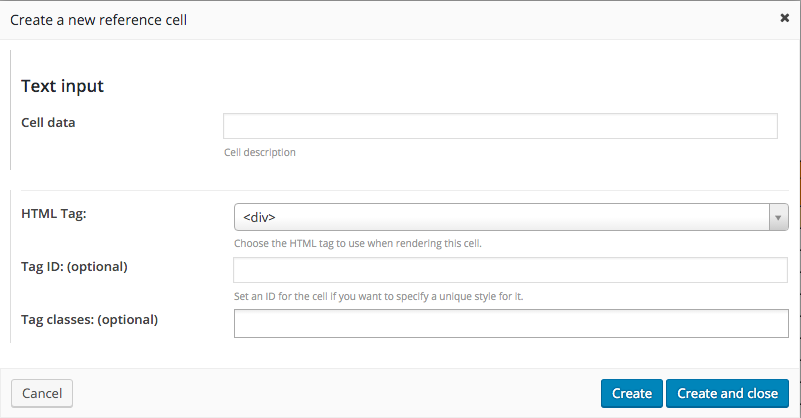
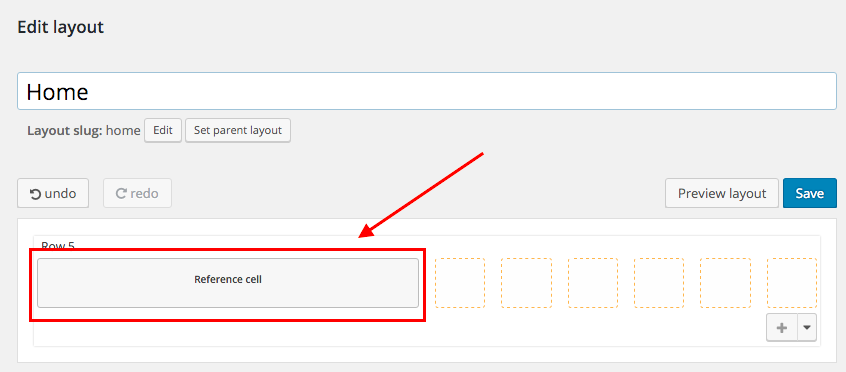
This is how the Layouts editor appears when we add a reference cell to the layout. Layouts will fully manage the data that’s entered into the text input field.
We now need to define what gets displayed in the Layouts editor when we add a reference cell. We do this via reference_cell_template_callback(), which we registered when we created the cell using register_dd_layout_cell_type(). We’ll just display the text data provided by the user.
// Callback function for displaying the cell in the editor.
function reference_cell_template_callback() {

  // This should return an empty string or the attribute to display.
  // In this case display the ‘text_data’ attribute in the cell template.

  return 'text_data';
}
This is how it looks in the editor after adding the cell.
Now that we have a cell in our layout, we need to display it in the front end. For this, we use reference_cell_content_callback().. the_ddl_field can be used to echo any of the fields. Here, we use it to output the ‘text_data’ field.
// Callback function for display the cell in the front end.
function reference_cell_content_callback($cell_settings) {
    ob_start();
    ?>

    <p>
        <?php the_ddl_field('text_data'); ?>
    </p>

    <?php
    return ob_get_clean();
}
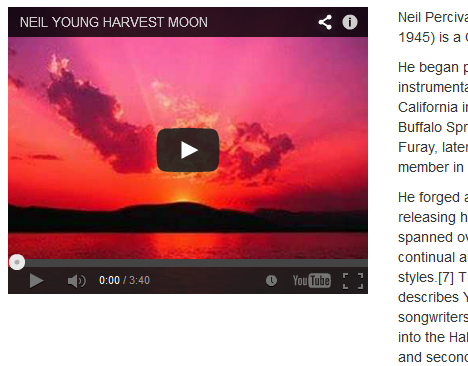
This is how it appears in the front end. Not very exciting, but it demonstrates the principle.

Adding repeating fields to a cell
Layouts also supports repeating fields. They can be used anywhere there’s repeating data. For example, an image gallery cell can contain multiple images. We can use the repeating fields API for this.
Let’s add a repeating field to our reference cell. We’ll use it to record a number of image URLs which we’ll later display.
We use ddl_repeat_start() and ddl_repeat_end() to define what should be repeated.
Any inputs fields between these calls be repeated.
<?php
    // Display repeatable fields
    // Form elements wrapped in ddl_repeat_start() and ddl_repeat_end() functions
    // will be repeatable
?>
<h3>
    <?php _e('Repeatable fields', 'theme-context' ); ?>
</h3>
<?php ddl_repeat_start('gallery', __('Add another item', 'theme-context' ), 4); // $group_name, $button_label, $max_items ?>
<p>
    <label for="<?php the_ddl_name_attr('gallery-item'); ?>"><?php _e('Add image URL', 'theme-context' ); ?></label>
    <input type="text" name="<?php the_ddl_name_attr('gallery-item'); ?>">
</p>
<?php ddl_repeat_end(); ?>
Now let’s have a look at the dialog for the cell. As you can see, we have a new input for adding an image URL as well as the button “Add another item” to let us add further images.
We can now go ahead and add several images.

Now we need to output the new repeating fields in the front end. To do this, we can use the_ddl_repeater() and the_ddl_sub_field().
the_ddl_repeater() iterates over the repeating fields. The field group is called “gallery” in this example to match the name we used in the dialog callback.
the_ddl_sub_field() displays the subfield for the current item. The subfield is called “gallery_item” in this example to match the name we used in the dialog callback.
<?php // Display repeatable fields ?>
<?php if ( has_ddl_repeater('gallery') ) : ?>

  <ul class="thumbnails">

     <?php // It looks very similar to the native WordPress Loop, which you're already familiar with ?>
     <?php while ( has_ddl_repeater('gallery') ) : the_ddl_repeater('gallery');?>

        <li>
            <a href="#" class="thumbnail">
               <?php // use the_ddl_sub_field('field-name') to display the field
                     // value or get_ddl_sub_field('field-name') to assign it to a
                     // variable ?>
                <img src="<?php the_ddl_sub_field('gallery_item'); ?>" alt="<?php _e('Image:','theme-context'); ?> <?php the_ddl_repeater_index(); // the_ddl_repeater_index() displays the loop index ?>">
            </a>
        </li>

     <?php endwhile; ?>
  </ul>

<?php endif; ?>
Let’s see how this looks in the front end.

Load cell template files in your theme
We recommend creating separate files for different cells. Each of these files can include the functions for displaying the cell in the Layouts editor as well as for rendering the cell.
After creating the cell files you’ll want to upload them to make them visible in your theme. To do so you can simply include them in your functions.php file. You can use this helper function in order to do that programmatically:
To do so you can simply include them in your functions.php file.
if( class_exists( 'WPDD_Layouts' ) && !function_exists( 'include_ddl_layouts' ) )
{
    function include_ddl_layouts( $tpls_dir = '' )
    {
        $dir_str = dirname(__FILE__) . $tpls_dir;
        $dir = opendir( $dir_str );
        while( ( $currentFile = readdir($dir) ) !== false ) {
           if ( $currentFile == '.' || $currentFile == '..' || $currentFile[0] == '.' ) {
              continue;
           }

           include $dir_str.$currentFile;
        }
        closedir($dir);
    }

    include_ddl_layouts('/inc/layouts/');
}
The function takes the path of the layouts to be read as an argument.
Handling Dialog Events
A cell type might require special handling when the cell dialog editor is initialized, opened, saved, or closed. These can be handled via events in Javascript.
The following events are fired:
When the dialog is initialized, an event named CELL_TYPE.init-dialog-from-content is triggered.
When the dialog opens, an event named CELL_TYPE.dialog-open is triggered.
When the dialog form is saved, an event named CELL_TYPE.get-content-from-dialog is triggered. (While the dialog-close event is triggered each time the dialog closes, this event is triggered when the dialog closes only if the save button had been pressed; otherwise, it won’t be triggered.)
When the dialog closes, an event named CELL_TYPE.dialog-close is triggered.
For our reference cell example, the cell type is reference-cell.
reference-cell.init-dialog-from-content, reference-cell.dialog-open, reference-cell.get-content-from-dialog and reference-cell.dialog-close are triggered.
// Custom events for reference-cell.php

jQuery(function($) {

    // On reference cell dialog initialise
    $(document).on('reference-cell.init-dialog-from-content', function(event, content, dialog){
        console.log("init-dialog-from-content", arguments)
        alert(' "init-dialog-from-content" event has been triggered');
    });

    // On reference cell cell dialog open
    $(document).on('reference-cell.dialog-open', function(event, content, dialog) {
        console.log("dialog-open", arguments)
        alert(' "dialog-open" event has been triggered');
    });

    // On reference cell dialog save
    $(document).on('reference-cell.get-content-from-dialog', function(event, content, dialog){
        console.log("get-content-from-dialog", arguments)
        alert(' "get-content-from-dialog" event has been triggered');
    });

    // On reference cell cell dialog close
    $(document).on('reference-cell.dialog-close', function(event, content, dialog) {
        console.log("dialog-close", arguments)
        alert(' "dialog-close" event has been triggered');
    });

});
All four of these events receive the following three arguments:
- The event object
- The content object (where the data is stored)
- The dialog object (the Javascript object handling the dialog data and actions)
Fields API
The fields API is used to display fields of cells on the front end. You can use these calls only from inside of the cell-content-callback(), which is used to render cells content.
API calls for rendering simple (not repeating) fields
- Displaying cell values
<?php the_ddl_field($field_name); ?>
- Testing cell values
<?php if ( get_ddl_field($field_name) == ‘some value’) { …. } ?>
API calls for rendering repeating fields
- Checking if the group has any more items
<?php has_ddl_repeater($group_name); ?>
- Moving to the next item in the group
<?php the_ddl_repeater($group_name); ?>
- Displaying the repeater index for the group
<?php the_ddl_repeater_index($group_name); ?>
- Obtaining the repeater index for the group
<?php $index = get_ddl_repeater_index($group_name); ?>
- Resetting the repeater index to the start of the group
<?php ddl_rewind_repeater($group_name); ?>
- Displaying the subfield for the current item in the group
<?php the_ddl_sub_field($field_name); ?>
- Obtaining the subfield for the current item in the group
<?php $field = get_ddl_sub_field($field_name); ?>
Typical loop example
This example shows how your code can load the repeater fields group called tabs, iterate through the different items and display the title and content field for each, as list items.
<?php if ( has_ddl_repeater('tabs') ) : ?>
<ul>
       <?php while ( has_ddl_repeater('tabs') ) :  the_ddl_repeater('tabs');?>
               <li>
                       <h2><?php the_ddl_sub_field('title') ?></h2>
                       <p><?php the_ddl_sub_field('content') ?></p>
               </li>
       <?php endwhile; ?>
</ul>
<?php endif; ?>
Translating cell fields
Text that users enter in fields of custom cells that you have developed must be sent to translation. The Layouts plugin provides you with this functionality and is fully integrated with the WPML translation plugin. You only need to define the translatable fields in your custom-created cells. Users will then be able to translate them using the WPML plugin.
To learn more about the translation workflow itself, please visit the WPML online document that explains this topic in more detail.
The Cell API features an option value called translatable_fields. This value represents an associative array in which the key is the name of the field, that is, the same name used in the the_ddl_name_attr function.
Each key then has an array containing the “title” and “type“, which are defined as follows:
- The “title” is information displayed in the translation editor
- The “type” is the type of editor to use when editing the field. It can contain the following three values:
- LINE – single-line field
- AREA – text-area field
- VISUAL – WYSIWYG field
Let’s look at an example of how this would appear in a simple text box that features a title field and content text-area. This code is a part of the cell-creating array passed to the register_dd_layout_cell_type.
'translatable_fields'	   => array(
	'box_title' => array('title' => 'Text Cell Title', 'type' => 'LINE'),
	'box_content' => array('title' => 'Text Cell Content', 'type' => 'AREA')
)
Translating repeating fields
Now let’s review an example of setting the translation of cell fields when we are working with repeating fields. As mentioned in the section, Adding repeating fields to a cell, we first must indicate what should be repeated, as in the following code.
ddl_repeat_start( 'slider', __( 'Add another slide', 'ddl-layouts' ), 10 );
// Here comes the part where you define your repeating fields inputs
ddl_repeat_end();
Any input fields, as well as other HTML and PHP code, between ddl_repeat_start and ddl_repeat_end will be repeated. Let’s now look at the entire example showing repeating fields for an image slider cell:
<?php ddl_repeat_start( 'slider', __( 'Add another slide', 'ddl-layouts' ), 10 ); ?>

<p>
	<label for="<?php the_ddl_name_attr('slide_title'); ?>"><?php _e( 'Caption title', 'ddl-layouts' ) ?>:</label>
	<input type="text" name="<?php the_ddl_name_attr('slide_title'); ?>">
</p>
<p>
	<label for="<?php the_ddl_name_attr('slide_text'); ?>"><?php _e( 'Caption description', 'ddl-layouts' ) ?>:</label>
	<textarea name="<?php the_ddl_name_attr('slide_text'); ?>" rows="3"></textarea>
	<span class="desc"><?php _e('You can add HTML to the slide description.', 'ddl-layouts'); ?></span>
</p>
<?php ddl_repeat_end(); ?>
After all your repeatable fields are defined (in this case, slide_url, slide_title and slide_text), you can add them to the translatable_field option value, as in the following.
'translatable_fields'	   => array(
	'repeater_name[field_name]' => array('title' => 'My Field Title', 'type' => 'LINE')
 )
In the previous example, the repeater_name is the first parameter of the ddl_repeat_start function, whereas the field_name is the name used in the the_ddl_name_atr function. Now, based on our previous example of all repeatable fields for our slider cell, we can define our translatable fields for these repeatable fields, as in the following.
'translatable_fields'	   => array(
	'slider[slide_title]' => array('title' => 'Slide title', 'type' => 'LINE'),
	'slider[slide_text]' => array('title' => 'Slide description', 'type' => 'AREA')
 )