Toolset is completely compatible with WPML and allows you to create multilingual themes. This page goes through the steps needed for you to include the translations with the Toolset-based themes you create and distribute.
Installing the necessary plugins
To be able to include translations with your theme, you will need to install the following plugins in your development environment:
- Multilingual CMS version of the WPML plugin
- WPML Translation Management
- WPML String Translation
Please note that you cannot bundle WPML with themes. Your clients will need to buy WPML plugin separately. To make this easy, you’re very welcome to include WPML Installer, which allows to buy and install WPML from within the admin dashboard, without manually uploading ZIP files.
Step 1 – Wrap texts for translation with wpml-string shortcodes
Similarly to PHP-based themes, themes that you build using Toolset will have some strings that display on the front-end.
You should wrap all translatable texts (strings) with wpml-string shortcodes. This should include:
- Layouts used as templates
- Layouts used as archives
- Views (the Filter, Loop Output and Content Templates used by the View)
- Toolset forms
Texts become translatable when you wrap them with the wpml-string shortcode. For example, this is a Visual Editor cell in a layout, with translatable texts:
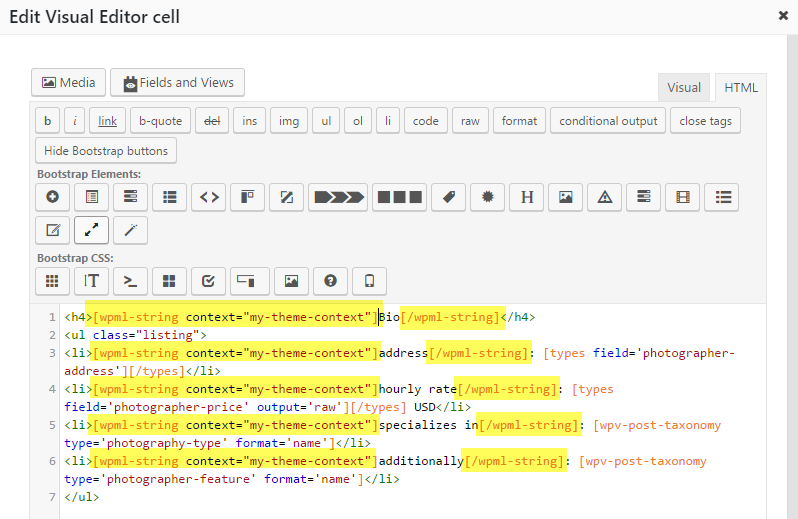
The format for using the wpml-string shortcodes is:
[wpml-string context="THE_CONTEXT"]STRING_FOR_TRANSLATION[/wpml-string]
For example:
[wpml-string context="genius theme"]Written on:[/wpml-string]
The context attribute is what groups all related strings together. Pick one context (and make it as unique as possible) and use it for all your strings.
Step 2 – Visit (on the site’s front-end) the pages that include the strings
In order for WPML to scan the strings for translation, you need to visit the pages that display them, at least once. The following checklist should help you:
| What you need to visit | Example |
|---|---|
| The site’s homepage | example.com/ |
| Examples of “single” types (a blog post, a page, one item from each custom type) | example.com/blog/january-news/
example.com/about-us/ example.com/machine/bg100-turbo/ |
| The archive of each type (main blog, blog category, custom post archives, search, 404) | example.com/blog/
example.com/blog/announcements/ example.com/machine/ |
| Pages that contain Views and Toolset forms | example.com/machine-deals/
example.com/add-machine/ |
Step 3 – Export the .po file with your theme’s strings
To be able to send your theme’s string to translation, you need to export them to a .po file. Go to the WPML -> String Translation page and scroll to the bottom, to the Import / export .po section, as displayed in the following image.
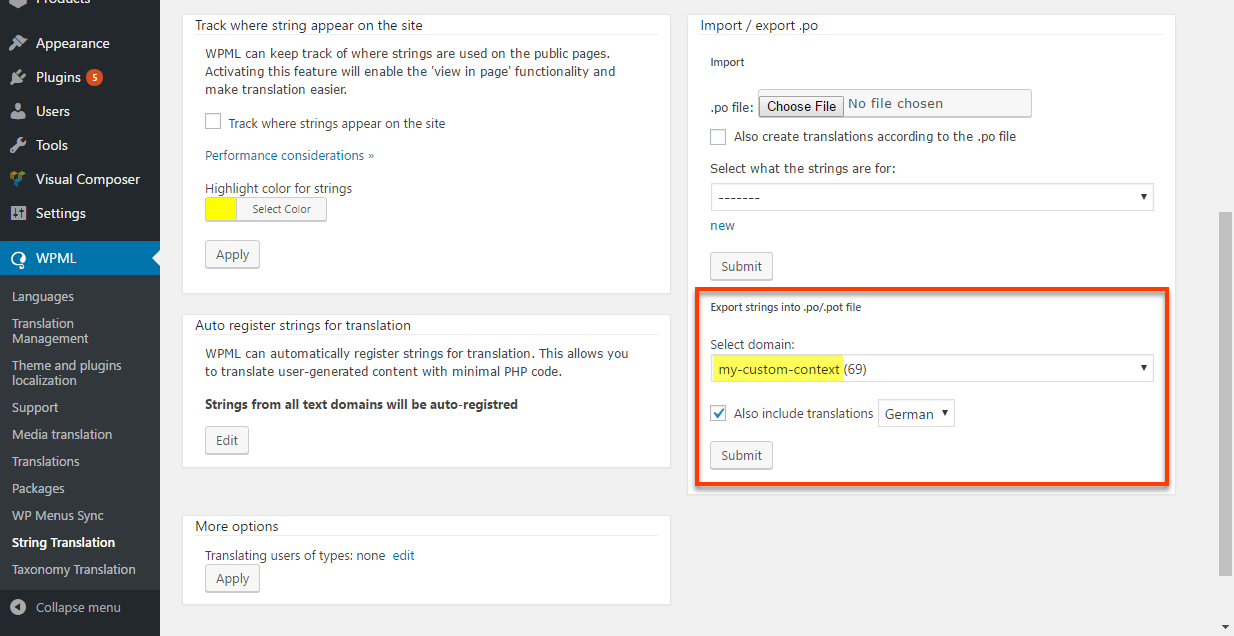
You need to select the domain used for your theme’s strings. In this case it is the context you used as an argument for the wpml-string shortcode. Select that context in the drop-down menu and click the Submit button.
A .po file containing your theme’s string downloads.
Step 4 – Send your theme’s .po file to translation
Now, you need to send the .po file exported in the previous step, to translation. We advise using a professional service to do this for you, like ICanLocalize, which allows you to upload the .po files for translation.

Most likely, only a small number of new strings will need translation.
Step 5 – Get the .mo files from translation and add them to the theme
When translation completes, you will have the .mo files for each translation language. The names of the .mo files should only include the language shortcut for the language they refer to.
Here are few examples for how to name these .mo files, based on the language translation they provide:
- German: de_DE.mo
- French (France): fr_FR.mo
- Spanish (Spain): es_ES.mo
- Spanish (Mexico) es_MX.mo
You can find the complete list of language shortcodes by going to the official WordPress page about Translation Teams, scrolling down to the language table, and looking at the WP Locale column.
ICanLocalize will deliver .mo files ready to use, with the correct names. If you are translating the theme yourself or with a different service, make sure to set the file names correctly.
You need to add the .mo files to the theme. Create a folder under the theme’s root directory with a descriptive name (/languages or /translations) would be great and save all the .mo files there.
Step 6 – Add a small translation loader code to the theme
Finally, put the following code in your theme’s functions.php file.
add_action( 'after_setup_theme', 'my_theme_setup' );
function my_theme_setup(){
    load_theme_textdomain( 'my-theme-context', get_template_directory() . '/languages' );
}
Naturally, you need to use your own theme’s textdomain, i.e. the context you used with the wpml-string shortcode.
Step 7 – Test and make sure that translations appear
Before opening the champagne bottles, it is always a good idea to test and make sure that everything is working.
Visit the front-end pages, change the language, and make sure that you are seeing all the theme’s texts translated.
Do not add languages to the “master” site (the site you are going to export the theme from), as this will add languages to the sample content that you deliver. Instead, create a copy of your site and add languages to it.